HOW FUNNELPHASE WORKS
Less chasing. More building.
Set up once. Bring in your work. Review and send.

See it in action
Tap a picture preview. One tool at a time.
EXAMPLE · FOUR COLUMNS TO START
Use the schedule you already have.
Lot, Scope, Start Date and Finish Date. Put all your schedule items on one Excel worksheet and upload the complete sheet together.
Saved scope assignments fill in matching managers and Order numbers. Review the loaded rows before saving. No Duration column is needed.
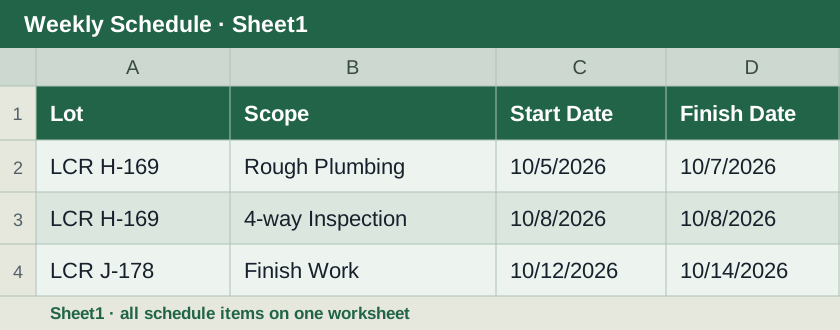
Lot · Scope · Start Date · Finish Date
One task per row. Include a Finish Date even for one-day work.
View larger Excel example1. Set up once
Guided setup walks you through jobs, trades and optional follow-up links. Save & next opens the next step. Leave and return anytime.
Start guided setupWhat should I have ready?
- Your lot names and addresses.
- Your scopes and the person responsible for each.
- Your current schedule with all jobs and dates.
Use matching job and scope names. Permits, notes and delivery contacts can wait.
More setup options
›Confirm your company workspace
Confirm your company workspace
Sign in with your approved company account and confirm you are working with the correct company’s jobs before importing a schedule.
- Sign in and confirm the lots belong to your company.
- Ask the administrator for separate company access before inviting another builder to add their own data.
›Add buildings, units and addresses
Add buildings, units and addresses
- Add individual locations or expand Paste a location list.
- Paste Community, Lot and Address columns for units; add whole-building names separately.
- Choose Save & next in guided setup, or Save changes in the setup menu. Check a few addresses.
| Community | Lot | Address |
|---|---|---|
| LCR-H | 169 | 123 Main St, Farr West, UT |
| LCR-H | 170 | 125 Main St, Farr West, UT |
Add “LCR H - 4 Plex” separately for whole-building work.
›Set scopes, contacts and Order
Set scopes, contacts and Order
- Search for a scope, enter its manager and edit its Order number.
- Clear and change several numbers before saving; organization happens when you save.
- Edit Text name to choose the wording shown in texts. Place your cursor inside the existing wording and delete or replace just the words you want. For example, Underground Electrical/Lateral can become Electrical/Lateral. Clear it to use the imported scope name; (Reporting) is removed from messages.
- Add trade contacts, then Save & next or Save changes. Text names change automatic message wording; use Reset to automatic if an older custom message is displayed.
›Choose correction scopes and your own work
Choose correction scopes and your own work
- Enable Available for TradeLot corrections for work that needs correction photos.
- Use Add superintendent scope for work you handle yourself, such as adjusting a door.
- Assign your own name so your work can have its own photos and texts.
›Add clear names, permits and notes
Add clear names, permits and notes
- Give short job names a readable heading, such as LCR J - 5 Plex.
- Add optional permit numbers and building notes.
- Save changes and check the job heading in Messages.
›Link later work without entering new dates
Link later work without entering new dates
In Follow-up links, choose a triggering scope and up to two later scopes. Messages include the same job’s dated follow-up even when it has a different manager or falls outside the look-ahead window.
- Choose the source scope, then search for the follow-up scope and select Add link.
- Save changes. Already linked scopes are excluded from the picker.
- Ensure the follow-up has a dated schedule row for the same job. It can belong to a different manager; a link cannot invent an installation date.
- For example, link HVAC Rough to 4-way Inspection. When HVAC Rough matches the selected tab, its message includes that job’s scheduled inspection date, even beyond the look-ahead range. Save and return to Messages; reset saved custom wording to automatic if necessary.
LCR F · 10/1Set Granite Tops
LCR F · dated for 10/23
The second task needs its own saved date.
›Set delivery preferences and team access
Set delivery preferences and team access
Text & email stores delivery preferences. People & access controls manager access and each trade’s view. Automatic delivery is not active on this installation yet.
- Save a name and phone, email or both, and select the preferred delivery methods.
- Read the delivery status before relying on automatic notices. Contacts alone do not send messages.
- In Team access, assign each signed-in trade its scope and preview the trade view. Site sharing permissions are managed separately by the administrator.
2. Schedule. Review. Send.
- Open Schedule → Paste schedule and upload your complete list.
- Check jobs, dates and manager assignments, then save.
- Open Messages, choose a manager, copy their text and send.
For Excel, keep every task on one worksheet. Each row needs Lot, Scope, Start Date and Finish Date.
Using Word, Notes or schedule pictures?
Excel: .xlsx, .xls, .csv and .tsv, or paste spreadsheet cells. Upload the whole schedule on one worksheet.
Word or Notes: upload a .docx table or tab-separated .txt. Pasted text needs one task per line with tab-separated fields.
Pictures: upload up to six clear photos or screenshots. Include all four columns. Review extracted rows, correct highlighted fields, then Replace and save schedule.
Dates: include the year and a Finish Date for one-day jobs. PDF upload is not supported; use screenshots of its schedule table.
New schedule and message tools
- Compact schedule rows: search by job or manager and click a header to sort.
- Message tabs: 2 Weeks → 1 Week → 2 Days → 1 Month → All.
- Jobs and items inside each job show soonest start dates first. Tied jobs compare their last start date, then their letter or number.
- Text name in Setup lets you edit existing scope wording word by word.
- Note for all messages today adds one saved note to the bottom of every text; tomorrow starts blank.
- Same-job follow-ups can have a different manager and later dates. For example: HVAC Rough → 4-way Inspection.
Detailed schedule, message and address instructions
›Import the complete current schedule
Import the complete current schedule
Open Schedule → Paste schedule. Replacing a schedule replaces its rows, while shared locations and assignments remain available.
- For Excel, put all schedule items on one worksheet and upload the complete schedule at once. Include Start and Finish for every row, even one-day work.
- For pictures, choose Upload schedule pictures, select up to six images, and set the year if it is not printed. Review the extracted jobs, scopes and dates, correct highlighted rows, then choose Use reviewed rows. Review the table and choose Replace and save schedule.
- Check the saved row count, active work, a few dates and manager assignments.
| Lot | Scope | Start Date | Finish Date |
|---|---|---|---|
| LCR H-169 | Rough Electrical | 9/17/2026 | 10/1/2026 |
| LCR H-169 | 4-way Inspection | 10/5/2026 | 10/5/2026 |
A one-day job repeats its date. Use the complete list when replacing.
›Search, sort and edit your schedule
Search, sort and edit your schedule
- In List, search for a job, lot, scope or manager to find work from the imported Excel schedule. Tap a compact row to open its editor. On phones, one row opens at a time.
- Click Order for Lowest to highest or Highest to lowest. Click Job/Lot, Scope or Manager for A–Z or Z–A, or Dates for start/finish sorting. Schedule column sorting does not change message date ordering.
- Choose Calendar, then 1 month, 2 weeks, 1 week or 2 days. The two-day calendar shows tomorrow and the next day.
- Today is highlighted; weekends are narrowed and muted. Managers keep consistent colors.
- Use Finish date, Start date, Job, Scope or Manager sorting, and print the selected view.
›Choose the right message window
Choose the right message window
Tabs run left to right: 2 Weeks, 1 Week, 2 Days, 1 Month and All. Short notices use the source task’s Start date; explicit same-job follow-ups accompany matching work.
- Message tabs run left to right: 2 Weeks, 1 Week, 2 Days, 1 Month and All. All shows all imported work, across every date.
- Choose 1mo or 2wks for upcoming and currently active work; dated follow-ups can appear beyond that range.
- 1 Week out (Reminder) includes work starting seven calendar days out.
- 2 Days out (Confirmation) includes work whose start is two working days away, skipping weekends and configured holidays. Finish dates do not trigger extra notices.
- Explicit follow-up links use that same job’s actual schedule dates across all tabs. In short-notice tabs, the source task must match the notice day; a follow-up alone does not trigger a reminder.
›Review, copy or print the texts
Review, copy or print the texts
- Select a manager from the scrollable list and check every job and date. Phones show about three managers at a time; scroll inside that smaller box for the rest.
- Within each message, the job with the soonest start date comes first, with its own items ordered by start date. Each job stays together. If jobs start on the same day, compare their last item’s start date; the sooner one comes first. If those dates also tie, use job letter or number: J before K, Lot 2 before Lot 10.
- Open Note for all messages today, enter a greeting or notice, and choose Save note. It appears at the very bottom of all manager texts, including copied and printed texts across every tab. It starts blank tomorrow. Clear note removes today’s note.
- Use Copy message, Print this text or Print all texts. Paste copied text in your normal messaging or email app; copying does not send it.
- If you edit wording, save your changes. Use Reset to automatic when you want current schedule-generated wording again. Saved custom wording does not automatically follow later date changes.
Hi Tyler,
2 Week Schedule
LCR H-169
• Rough Electrical 9/17-10/1
• Electrical Inspection 10/5
LCR J - 5 Plex
• Set Fixtures 10/8
›Share a building’s lot addresses
Share a building’s lot addresses
- Open Lots and the building you need.
- Use the building address text action to prepare the whole list, or Copy lot address for one unit.
- Review the text before sharing. Browser sharing support varies; copying provides a fallback.
You send the prepared texts yourself. Automatic delivery is not active yet.
3. Walk it. Say it. Organize it.
- Open TradeLot → Field Walk → Voice Walk. Add a photo.
- Say what needs fixing and which room. Check the job and scope, then Save & next.
- Finish inspection & save list uploads the walk and opens its report and trade texts.
Save & next keeps drafts on this device. Reconnect before finishing, and keep drafts until the upload succeeds.
Open TradeLotBatch photos, building texts and completion
›Walk it. Say it. Organize it.
Walk it. Say it. Organize it.
- Open Field Walk → Voice Walk, then choose the job and upload a photo.
- Allow microphone access, record a short description such as “Kitchen: straighten the light,” and review the suggested scope.
- Check the description and Fix by date, then choose Save & next. That saves the item on this device and prepares the next upload without opening the camera automatically.
›Finish the inspection and upload your list
Finish the inspection and upload your list
Save & next protects drafts on this device. Finish inspection & save list uploads them and opens the inspection report and trade texts.
- Reconnect to reliable service before finishing. Keep this device’s browser data until the upload succeeds.
- Select Finish inspection & save list and wait for the funnel. If a connection fails, keep the drafts and retry.
- Open the report and check the saved photos and texts. Device drafts are available for retry; this website is not yet a full offline app.
›Review a batch of existing photos
Review a batch of existing photos
- Choose up to 40 photos. For Trade Walk, choose the scope first.
- Arrange a clear lot-card picture before that lot’s corrections, then the next lot card.
- Wait for analysis. Review dividers, lot, scope and description for every correction; fix items needing attention before posting.
Each divider assigns the lot to following pictures until the next divider.
›Send one text per trade for a whole building
Send one text per trade for a whole building
- Open the job or building and choose its trade texts. Check the lot headings and grouped Fix-by dates.
- Copy or print the text. Photo-only items are summarized instead of repeating the same caption.
- Prepare the correction pictures for that trade; lot divider pictures keep the building’s photos in the text’s order. Share or download the prepared files, then attach them yourself.
›Review the trade’s completed work
Review the trade’s completed work
Open work needs fixing; Under review means the trade submitted completion; Closed means the manager accepted or completed it.
- The trade opens an item and adds a completion note or fixed photo.
- The manager reviews the submission and closes it, or returns it for more work.
- Use filters to inspect unfinished, submitted and closed work.
Trade needs to fix it
Trade marked it done
Manager accepted it
›Complete one item or the whole inspection
Complete one item or the whole inspection
- Choose the completion action for the item, selected job or inspection.
- Write how it was completed. The saved history includes the note, author and completion time.
- Existing completion notes and photos stay available when the remaining items are completed.
›Return to saved inspections
Return to saved inspections
- Open Saved inspections and select the report.
- Check its photos, notes, completion history and prepared texts.
- Use Delete inspection only when the list and its photos should be removed. Use Complete to preserve a finished job’s records.
Need help with something?
- Unassigned or Order 999
- Check the scope spelling and its manager and Order in Setup.
- Missing job in a message
- Check the window and manager. Longer windows include active work; short notices use only the Start date. Reset old custom wording if needed.
- Import stops
- Give every schedule row a valid Finish date, including one-day items.
- Old message text
- Use Reset to automatic for that trade and range.
- Wrong lot name or address
- Update the message name in Setup or recheck the Lots import.
- Scope missing in TradeLot
- Enable Available for TradeLot corrections in Project setup → Scopes & trades and save.
- Lot card added as a correction
- Before posting the walk, mark that picture Use as lot divider and verify the following pictures’ lot.
- Follow-up missing
- Save the link in Setup → Follow-up links and confirm the target has a dated row for the same job. A different manager is allowed. The source must match the selected window; All includes every date. Reset to automatic if saved custom wording is shown.
- Message scope wording needs a change
- Open Setup → Scopes & trades → Assignments & order, select the scope and edit its Text name. Existing wording is editable: delete only Underground from Underground Electrical/Lateral, then save.
- Daily note missing
- Open Messages → Note for all messages today, enter the note and select Save note. It applies to every look-ahead tab today and starts blank tomorrow.
Previews use example data. Confirm your company’s workspace before adding jobs.